


Exposure in photography: how to understand and set it (without stress)
Exposure is one of those words that sounds "technical" but in practice means something very simple: how much light you let into the camera. The exposure determines whether the photo will be bright, dark or "on point". But it's not just about brightness - exposure also affects noise, sharpness, motion blur and the atmosphere of the photo.
In this guide, SpotMeUp breaks down exposure into prime factors: exposure triangle, light metering modes, EV, histogram and quick settings for the most common situations.
1) What is exposure in photography?
Exposure is the amount of light that hits the matrix (or film) when a photo is taken.
You can control it with three settings:
aperture (f/…) – how much light enters at the same time
exposure time (1/… s) – how long the light enters
ISO – how much you "amplify" the signal from the matrix
Together they form theexposure triangle.
2) Exposure triangle: aperture, time and ISO
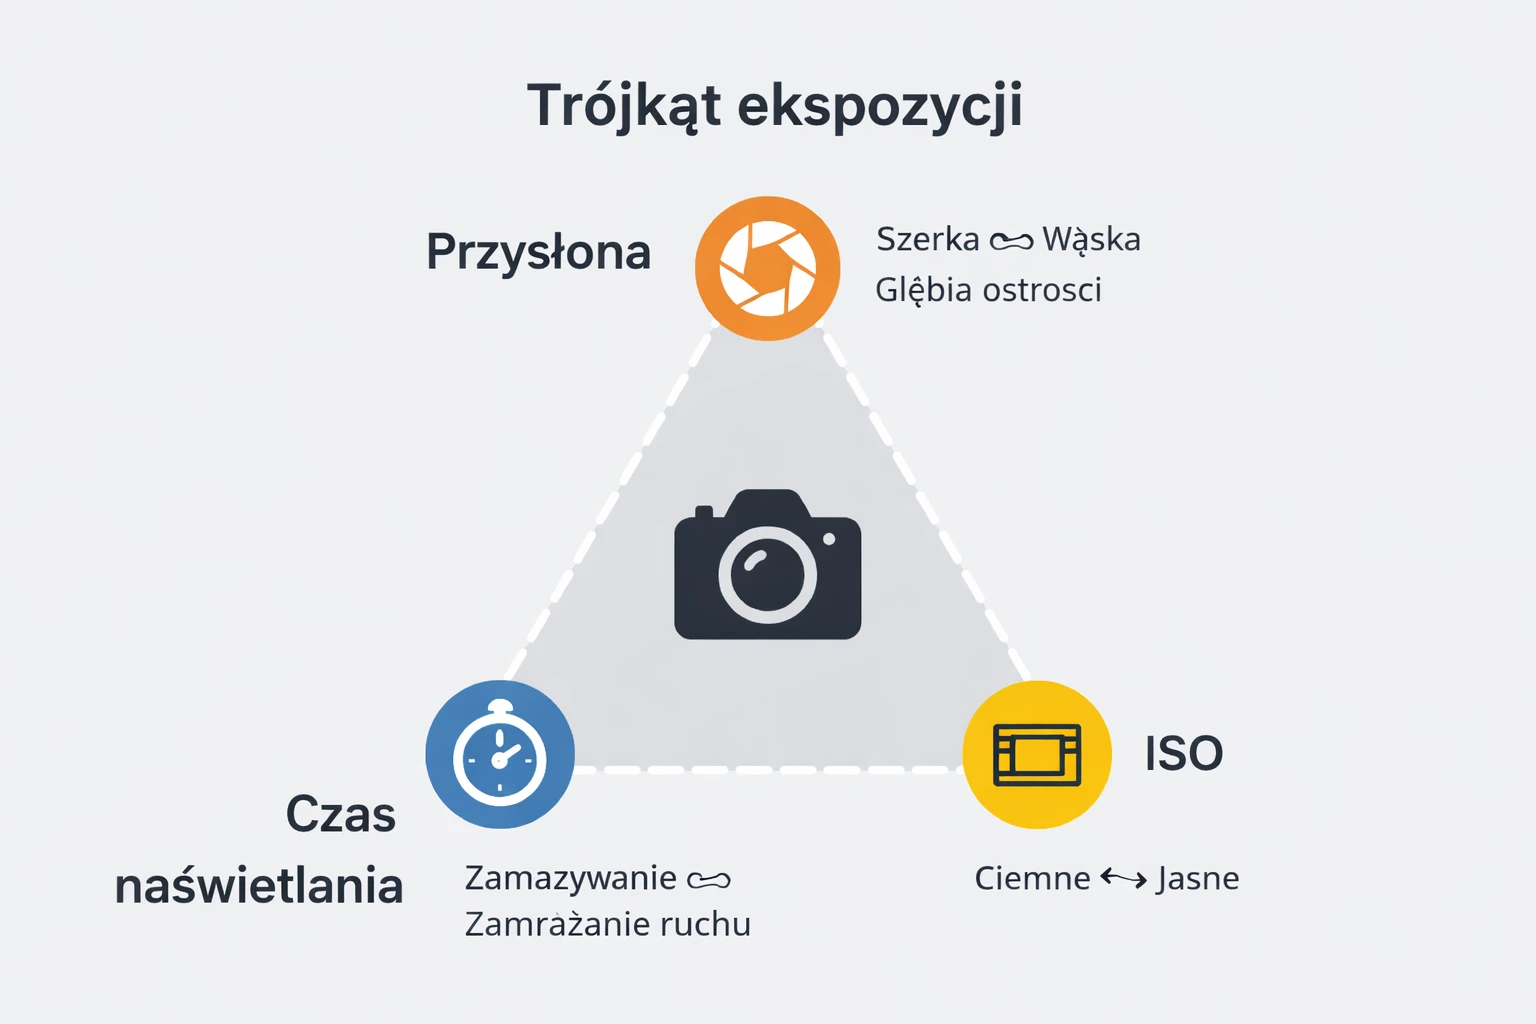
Aperture (f-stop)
Aperture affects:
brightness (lower f = brighter)
depth of field (lower f = blurrier background)
Examples:
f/1.8–f/2.8 → portraits, blurred background
f/8–f/11 → landscapes, sharp throughout the frame
Exposure time
Time affects:
brightness (longer time = brighter)
motion (short time = freeze, long time = blur)
Examples:
1/1000–1/250 → sports, fast movement
1/125–1/60 → “normal” handheld scenes
1/10, 1s, 10s → streaks, milky water (usually tripod)
ISO
ISO affects:
brightness (higher ISO = brighter)
noise (higher ISO = more grain/noise)
Principle:
keep ISO as low as possible (100–200),
raise the ISO when there is no light and you cannot increase the exposure time (due to blur) or open the aperture.
SpotMeUp poleca
The easiest order to set exposure:
set theaperture for the effect (e.g. background blur vs sharpness in the landscape)
selecttimefor movement (freeze or blur)
only then raiseISOif it is still too dark
3) Underexposed and overexposed photo – how to recognize it?
Underexposure → photo too dark, loss of detail in the shadows
Overexposure → too bright, "burned out" sky/skin, loss of detail in highlights
In practice, overexposure most often hurts becauseburned out highlights cannot be recovered as easily as shadows (especially in JPEG). That's why many photographers prefer to "protect the lights."
4) Light Metering: How does the camera decide exposure?
The camera measures the light and "guesses" the exposure. Problem: he doesn't know what's important in the frame.
The most common measurement modes:
matrix/evaluation – generally the best one to start with
center-weighted – more emphasis on the center
spot – measures a small fragment (e.g. face, moon)
When is the camera wrong?
snow / beach (bright scene → the camera darkens, comes out gray)
night (dark scene → camera brightens, makes "day")
backlight (person in front of the window → dark face)
5) Exposure Compensation (EV): The fastest tool
EV is a correction of what the camera proposes.
+EV → brighter
–EV → darker
Examples:
snow → often +0.7 to +1.7 EV
photos against the sun →+EV for the face
bright sky / west → often –0.3 to –1.0 EVso as not to burn out the clouds
EV most often operates in A/Av and S/Tv (semi-automatic) modes.
6) Histogram: the best “detector” of exposure
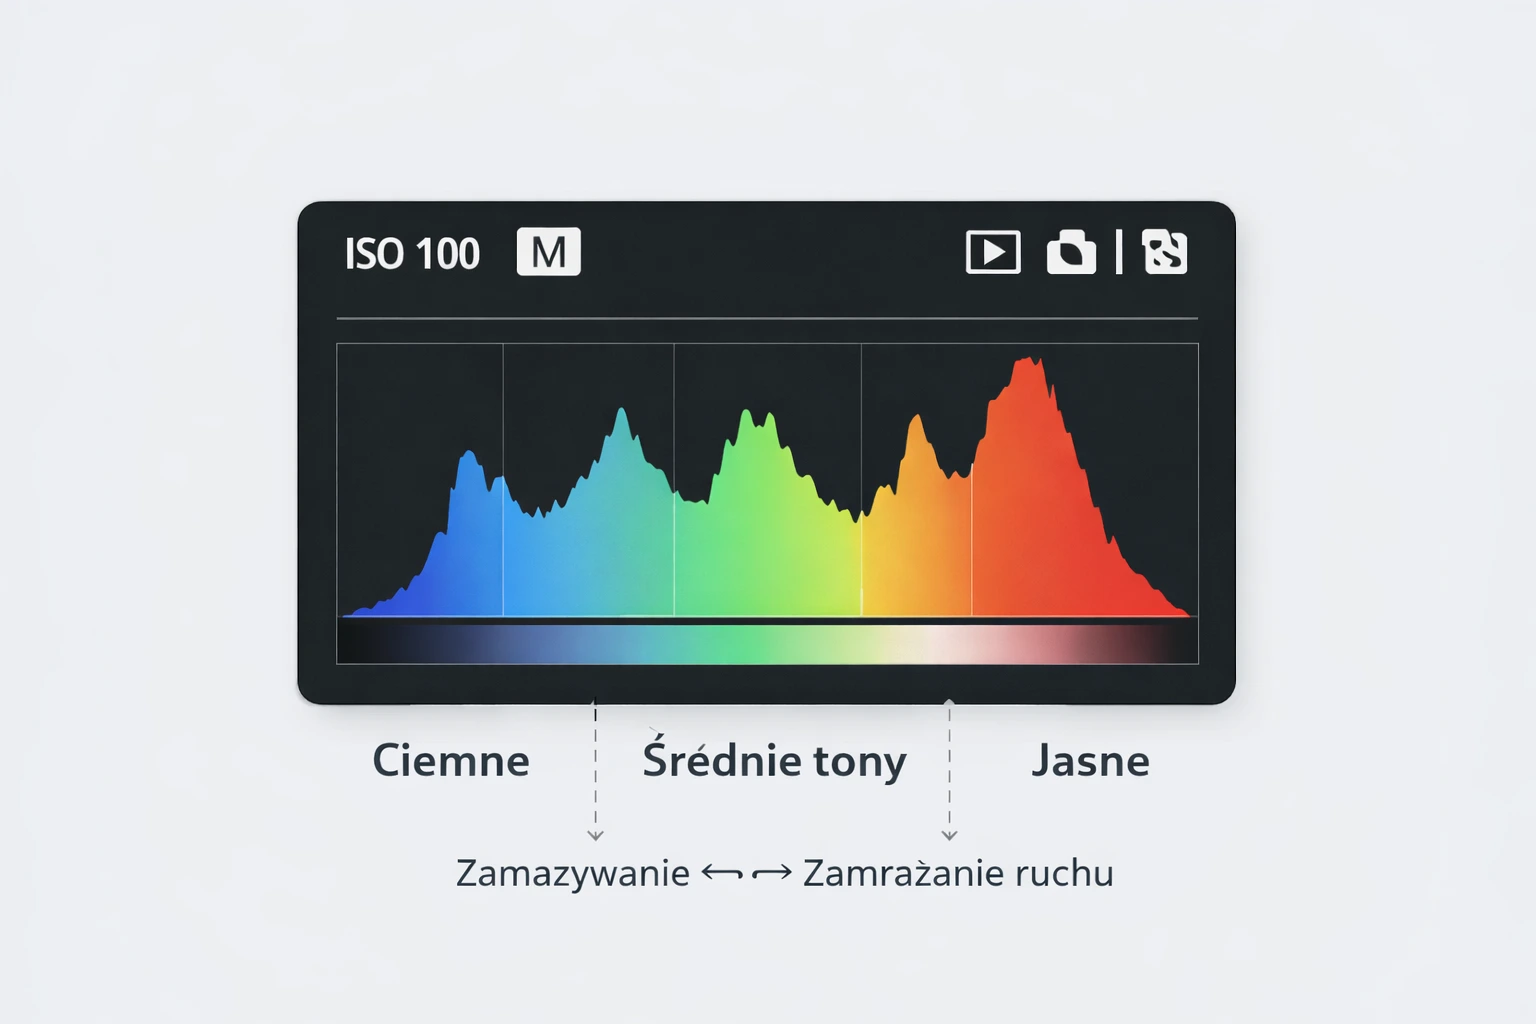
The histogram shows the brightness distribution:
left side → shadows
right side → lights
What to remember:
if the histogram "sticks" to the right → risk of burnout
if it "sticks" to the left → risk of losing detail in the shadows
You don't have to be perfectly "in the middle". The histogram should be correct for your scene (night will naturally be more to the left).
7) Exposure in practice: quick settings for popular scenes
Daytime portrait
trip A/Off
f/1,8–f/2,8
time min. 1/200 (to avoid blur)
ISO as low as possible
if the face is dark: +EV or spot metering on the face
Landscape
f/8–f/11
ISO100
time depends on light (tripod at sunset/east)
it is often worth dimming it slightly (–EV) to protect the sky
Interiors / evening
open aperture (e.g. f/1.8–f/2.8)
time min. 1/60 handheld (or shorter)
You increase the ISO as much as necessary (e.g. 800–3200)
Ruch / sport
tryb S/Tv
1/500 and faster (sometimes 1/1000)
ISO increases because time counts
8) RAW vs JPEG and exposure
If you can, shoot inRAWbecause:
easier to recover highlights and shadows,
easier to improve white balance,
you have more control in processing.
In JPEG, the exposure must be more "perfect" because the file loses information faster.
ChecklistSpotMeUp: how to set exposure in 30 seconds
What is important: background blur or sharpness? → set theaperture
Is something moving? → set thetime
Is it dark? → raiseISO
Check thehistogram
If the camera is wrong → use EV (+ or –)
FAQ (pod SEO)
What is exposure in photography?
Exposure is the amount of light that hits the sensor when a photo is taken. You control it with aperture, shutter speed and ISO.
How to set the exposure so as not to burn out the sky?
Dim the exposure (–EV), check the histogram and “protect highlights.” It's easier to recover details in RAW.
What is the exposure triangle?
This is the relationship between aperture, shutter speed and ISO. Changing one parameter affects the others and the brightness of the photo.
Is it better to underexpose or overexpose the photo?
It's usually better to slightly underexpose and save shadows in RAW than to burn out highlights that can't be recovered.
SpotMeUp recommends (mini exercise)
Take one scene (e.g. a window in a room) and take 3 photos:
0 EV
+1 EV
-1 EV.
Compare where the details are in the sky and in the shadow. This is the fastest exposure lesson.
